

Saturday 25 February 2012
Thursday 23 February 2012
The joys of Lambing


We have been very lucky this year as we have had several triplets born, unfortunately sheep aren't designed to raise more than two lambs at a time as they only have two functioning teets, this means that sometimes we need to help our ewes out with a little bit of bottle feeding. Not that it's too much trouble for our students...
Wednesday 22 February 2012
Signs of Spring...
Spring must be here as the bleating of newborn lambs fills the air around the farm...
 |
| The Ewe's have a nice warm barn in which to give birth |
 |
| The ewe's are left to bond with their lambs, in case they are seperated they are clearly marked so we can reintroduce them. |
 |
| During labour the ewe's have the safety and securtity of the barn but during the day they are free to graze in the open air |
 |
| One of our newest arrivals, as soon as he's strong enough he'll be out and frolicking in the fields |
 |
| Cosying up in the creche |
Sunday 19 February 2012
Saddleback Weaners for Sale...
These are a small selection of our pedigree stock for sale. If you are interested contact us at 01525 404462
Saturday 11 February 2012
How to Butcher a Pig...
Traditionally we have always receieved our pigs ready butchered courtesy of Helletts and Son from Kimbolton. This weekend however, we decided to have a go ourselves. At the end of the day how hard can it be? Well here is a guide of how to butcher a pig:
You will need:
A bone saw, a set of butchers boning knifes and a good quality butchers steak knife. Also of some use would be a meat cleaver and a steady hand!!!

1. Start by removing the head. Use a good quality butchers knife to slice about three fingers from the back of the ear down towards the spine until you meet bone. Roll the half over and repeat until your cut meets the bone. Use a bone saw to cut through the bone.

2. You now need to seperate the hind leg or hams. The pelvic bone should be partially visible from where the pig has been split. Use this as a guide to separate the leg at right angles to the line of the spine (A row of bones running along the back of the pig often knwon as the chine bones).
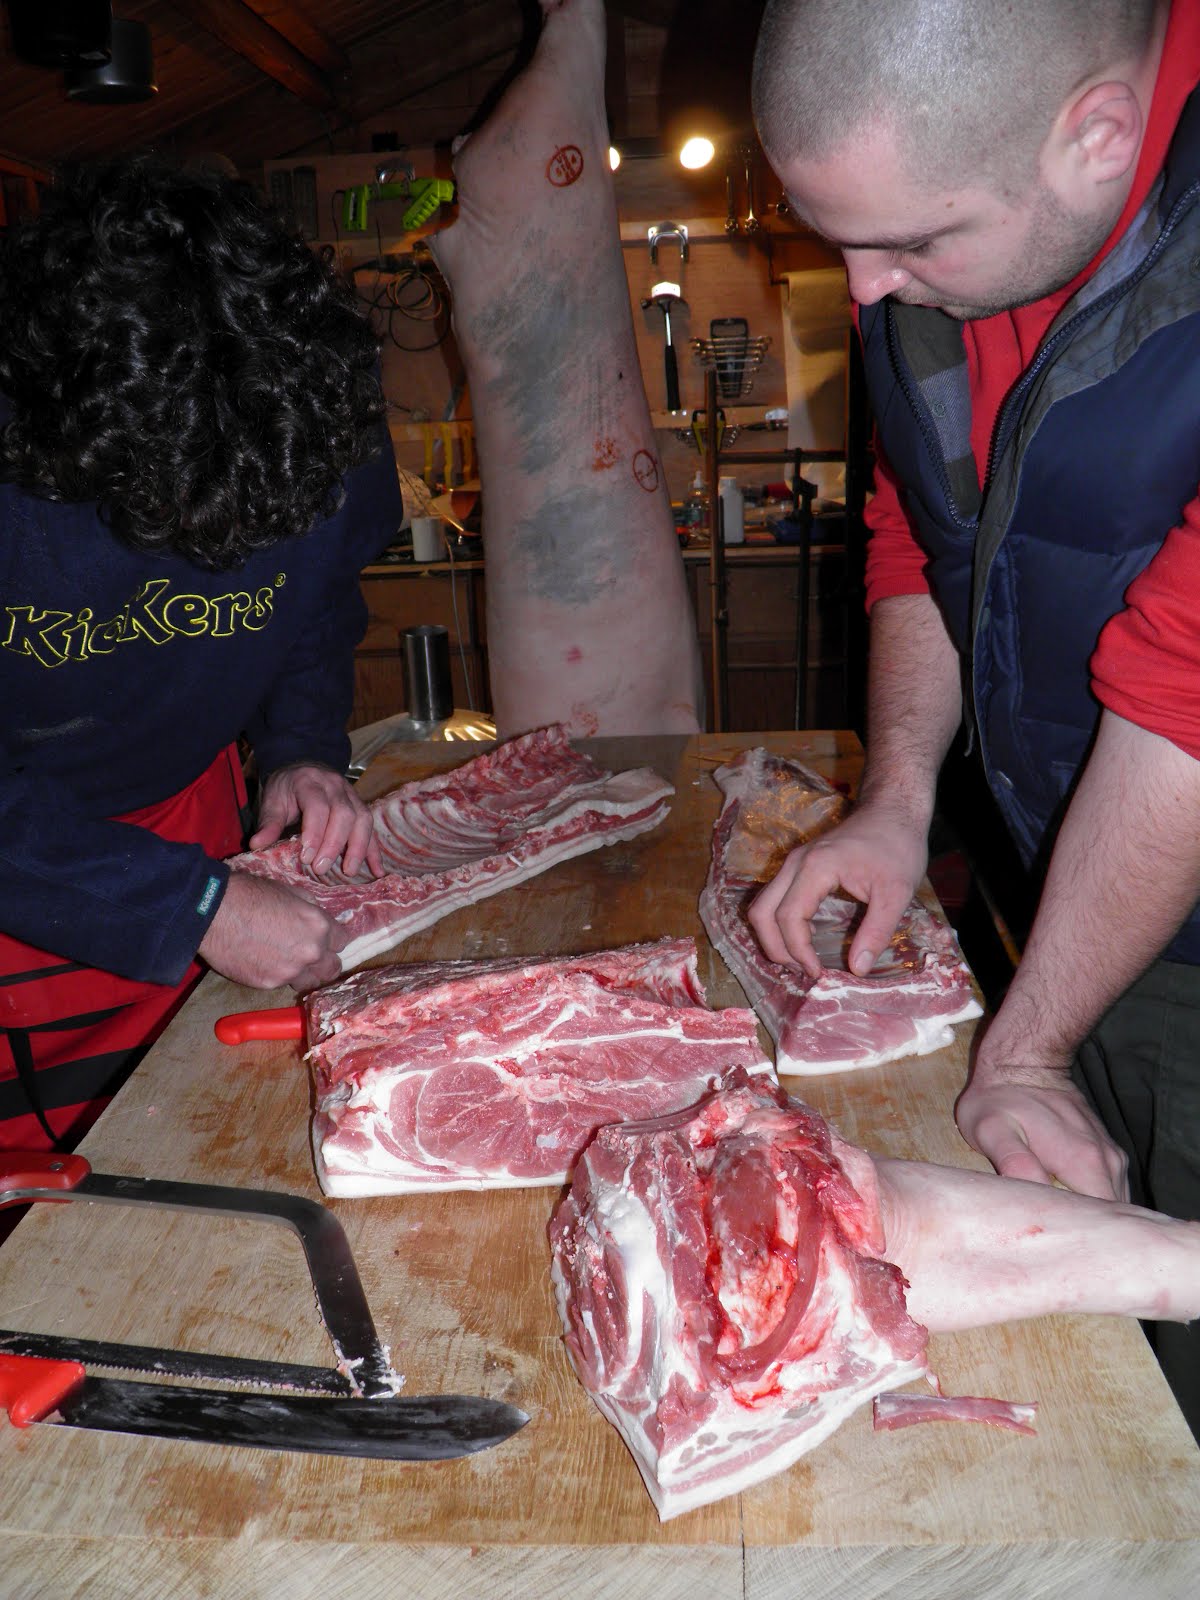
3. Next remove the belly from the loin. At the rear of this section (The section formally attached to the ham) Their is a clear demarcation between the scrag end of meet and the lighter leaner eye of the chump end. Using this as start point use a knife to run along the full length of the pig from this point half way up the ribs and all the way along under the chine bones. Use a sharp boning knife to start your cut following the line until you meet the rib. Switch to the saw and using your hand to support the pig underneath saw through the ribs. Finish this cut with the knife and you should be left with two clear sections as in the picture. In the fore ground you can see the two sections of the shoulder and front leg (Picnic ham). The two sections being handled are the loin with spare rib on left (tenderloin already removed) and belly with short rib on the right.
4. Next you need to remove the tenderloin, it sits in the top section of the middle of the pig (The loin section) at the chump end. Using the chine bones as a guide follow their natural line to gently slice this cut from the rib and chine.
5. Now you can seperate the front leg and shoulder. A good rule of thumb is to use the ribs as a guide when seperating this section. Count four ribs along from the front of the and push a boning knife all the way through to mark the line of cut. Use a steak knife to start your long cut at right angles to the chine. When the knife hits the chine switch to the bone saw to seperate out the joint. This joint can now be cut in half at the elbow joint leaving you with the shoulder joint and the picnic ham .
 6. You are now left with some decisions to make. It is best to seperate the belly section into two halves by slicing neatly just before the ribs.
7. The loin section is best split into three, The chump (The section of the loin containing only chine bones but no ribs) is split from the loin and makes a lovely stuffed and rolled joint. This just leaves the loin joint with spare ribs attached. These are easily removed by using the ribs to gently guide the cut of the knife.
You are now left with several very large joints and several much smaller ones. The larger joints can be literally cut in half with liberal use of knife and saw. All told half a pig will yield a thoroughly good amount of tasty meat.
You will need:
A bone saw, a set of butchers boning knifes and a good quality butchers steak knife. Also of some use would be a meat cleaver and a steady hand!!!

1. Start by removing the head. Use a good quality butchers knife to slice about three fingers from the back of the ear down towards the spine until you meet bone. Roll the half over and repeat until your cut meets the bone. Use a bone saw to cut through the bone.

2. You now need to seperate the hind leg or hams. The pelvic bone should be partially visible from where the pig has been split. Use this as a guide to separate the leg at right angles to the line of the spine (A row of bones running along the back of the pig often knwon as the chine bones).
 |
4. Next you need to remove the tenderloin, it sits in the top section of the middle of the pig (The loin section) at the chump end. Using the chine bones as a guide follow their natural line to gently slice this cut from the rib and chine.
5. Now you can seperate the front leg and shoulder. A good rule of thumb is to use the ribs as a guide when seperating this section. Count four ribs along from the front of the and push a boning knife all the way through to mark the line of cut. Use a steak knife to start your long cut at right angles to the chine. When the knife hits the chine switch to the bone saw to seperate out the joint. This joint can now be cut in half at the elbow joint leaving you with the shoulder joint and the picnic ham .

7. The loin section is best split into three, The chump (The section of the loin containing only chine bones but no ribs) is split from the loin and makes a lovely stuffed and rolled joint. This just leaves the loin joint with spare ribs attached. These are easily removed by using the ribs to gently guide the cut of the knife.
 |
| Splitting the Ribs from the loin |
 |
| The spare rib and remaining loin joint, each best split into two halves |
You are now left with several very large joints and several much smaller ones. The larger joints can be literally cut in half with liberal use of knife and saw. All told half a pig will yield a thoroughly good amount of tasty meat.
 |
| Joints boned and rolled ready for roasting |
 | |
| Vacuum packed ready for the freezer all told 8 family roasting joints and many other interesting cuts from just 1/2 a pig |
 |
| All the major joints before cutting into smaller more mangeable pieces |
 |
| One half down, one half left... |
Subscribe to:
Posts (Atom)